Python notebooks and the SARK-110 Antenna Analyzer
The SARK-110 can be controlled from a computer using scripts written in Python programming language. For this purpose, there is an open source library and examples written in Python that facilitates this task and can be used from Windows, Linux or Mac OS. The library includes some basic examples that are normal Python scripts, and also some examples written as Jupyter Notebooks.
As described in the Jupyter website, "the Jupyter Notebook is an open-source web application that allows you to create and share documents that contain live code, equations, visualizations and narrative text. Uses include: data cleaning and transformation, numerical simulation, statistical modeling, data visualization, machine learning, and much more".
The provided notebook examples, such as https://github.com/EA4FRB/sark110-python/blob/master/src/plot_example.ipynb, illustrate how to use the libray or more properly stated, the Python Sark110 class, and plot the acquired data.
There are several methods for installing Jupyter notebook, requiring all of them having installed Python as prerequisite. These methods are described in the following installation instructions. Besides, some IDEs such as JetBrains PyCharm Professional edition and Microsoft Visual Studio Code provide support for the notebooks. In my case, I decided to use VS code for developing the notebooks, because it offers native support of Jupyter notebooks, Intelligent code Autocomplete (aka IntelliSense), and Variable Explorer to keep track of the current state of your notebook variables.
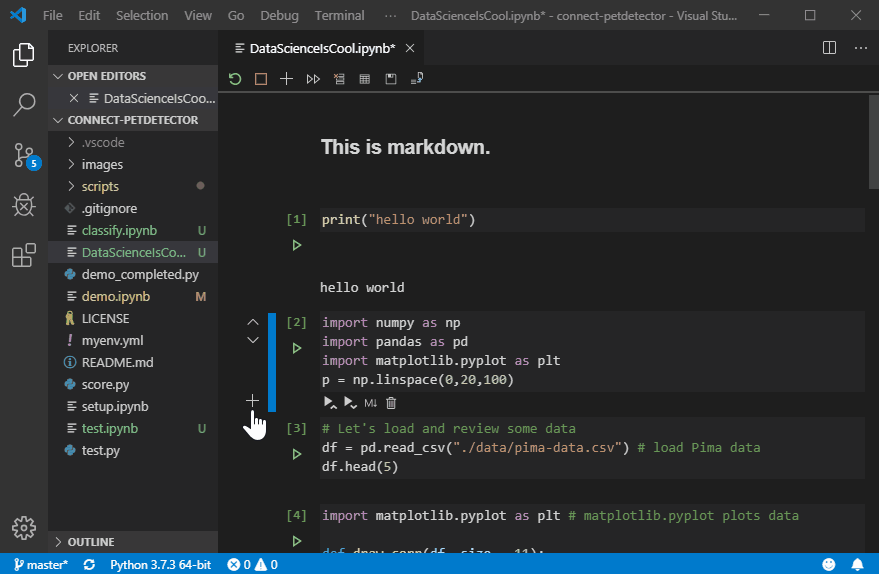
Open existing Notebook in VS Code: After restarting VS Code IDE, Open Jypyter Notebook file (.ipynb file) from the file menu, e.g. plot_example.ipynb.
After loading the notebook plot_example.ipynb, connect the analyzer to the computer, and click on "Run all cells" present on the top left side of the screen.


As described in the Jupyter website, "the Jupyter Notebook is an open-source web application that allows you to create and share documents that contain live code, equations, visualizations and narrative text. Uses include: data cleaning and transformation, numerical simulation, statistical modeling, data visualization, machine learning, and much more".
The provided notebook examples, such as https://github.com/EA4FRB/sark110-python/blob/master/src/plot_example.ipynb, illustrate how to use the libray or more properly stated, the Python Sark110 class, and plot the acquired data.
There are several methods for installing Jupyter notebook, requiring all of them having installed Python as prerequisite. These methods are described in the following installation instructions. Besides, some IDEs such as JetBrains PyCharm Professional edition and Microsoft Visual Studio Code provide support for the notebooks. In my case, I decided to use VS code for developing the notebooks, because it offers native support of Jupyter notebooks, Intelligent code Autocomplete (aka IntelliSense), and Variable Explorer to keep track of the current state of your notebook variables.
There is a complete setup and usage guide from Microsoft, so I will not repeat here. For setting up the environment, it is basically needed to install Python and IntelliCode extensions and restart.
How to use Jupyter Notebook in Visual Studio Code
Create New Notebook in VS Code: shortcut CTRL + SHIFT + P (Windows) and run the “Python: Create Blank New Jupyter Notebook” command.Open existing Notebook in VS Code: After restarting VS Code IDE, Open Jypyter Notebook file (.ipynb file) from the file menu, e.g. plot_example.ipynb.
After loading the notebook plot_example.ipynb, connect the analyzer to the computer, and click on "Run all cells" present on the top left side of the screen.

Scroll down to the botton of the notebook and you will see the beatifull plots of the measured data, if everthing went well.

Then you can interactively change the code of each cell and click on the Play button present on the left side to
execute the code present in this cell. E.g. you can change the colors of the plot in the cell that renders the plot and run again to quickly see the result.
As you write code, IntelliSense will give you intelligent
code complete suggestions right inside your code cells. You can further
supercharge your editor experience by installing the IntelliCode extension to
get AI-powered IntelliSense with smarter auto-complete suggestions based on
your current code context.
 |
| Source: Microsoft |
Comments
Post a Comment